Category Archives: Summer

Lemon Pound Cake

Springtime.  Sun, longer days, dreams of Summer bliss.  All such happy, happy  thoughts.

See, the gods and goddesses got the lemon season totally right.  Sunny yellow?  Check.  Tart but ready for a bit of sweet sugar?  Check.  A perfect transition between seasons.

Yet, the gods and goddesses did manage to get a few things wrong.  Limes and avocados ripe in the winter to spring months, but the tomatoes for guac in August.  What in the world does that do to margarita season? Another gripe is the whole root vegetable thing in October.  Here along the Pacific coast, October is sunny and warm and inviting and begs for leisurely walks to soak in the sun’s rays.  Do root vegetables go with this vibe?  I think not.

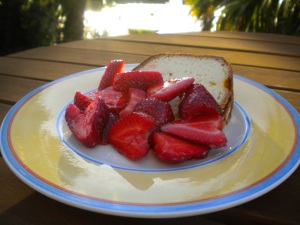
For now, let’s get back to Springtime, and lemons, and strawberries and make a lemon pound cake and smother a thick slice with strawberries fresh from the field.  We can all get on board with that plan.

Lemon Pound Cake

recipe inspired by Cooking Light , strawberries from Chan’s strawberry stand

Ingredients:

For the cake

  • Cooking spray
  • 3 TBS dry breadcrumbs
  • 3 1/4 cups all-purpose flour
  • 1/2 tsp baking soda
  • 1/4 tsp salt
  • 3/4 cup butter or stick margarine, softened
  • 2 1/2 cups sugar
  • 3 large eggs
  • 1 1/2 TBS grated lemon rind
  • 1/4 cup fresh lemon juice, divided
  • 8 oz low-fat sour cream
  • 1 cup powdered sugar

For the topping:

  • 2 baskets fresh strawberries, cleaned and sliced into thirds
  • 1 TBS sugar

Directions:

  1. Preheat oven to 350°.
  2. Coat a 10-inch tube pan with cooking spray, and dust with the breadcrumbs.
  3. Lightly spoon flour into dry measuring cups; level with a knife. Combine flour, baking soda, and salt in a bowl; stir well with a whisk. Beat the butter in a large bowl at medium speed of a mixer until light and fluffy. Gradually add the granulated sugar and lemon extract, beating until well-blended. Add eggs, 1 at a time, beating well after each addition. Add grated lemon rind and 2 tablespoons lemon juice; beat 30 seconds. Add flour mixture to sugar mixture alternately with sour cream, beating at low speed, beginning and ending with flour mixture.
  4. Spoon batter into prepared pan. Bake at 350° for 1 hour and 10 minutes or until a wooden pick inserted in center comes out clean. Cool in pan 10 minutes on a wire rack; remove from pan. Cool completely on wire rack. Combine 2 tablespoons of lemon juice and powdered sugar. Drizzle glaze over top of cake.
  5. Prepare strawberries by combining strawberries and sugar in a bowl and allowing to sit for at least 30 minutes.
  6. Slice lemon pound cake and top with strawberries.

Notes:

  1. Simply delicious!
  2. This is a perfect dessert for a meal you are hosting because the cake can be made a day before.
  3. Sneaking a thin slice of the pound cake for breakfast is totally acceptable.

Fig Pizza with Pomegranate Cumin Dressing

Have you ever discovered something for the first time, only to realize it was right in front of your nose all along?  This summer I discovered the Tachella Family farm stand.  I’ve driven by it for years, but rarely stopped in.  They have a wide variety of fruits and veggies and ample parking.  They even note on each bin whether the contents are from their own farm or another farm, and usually even name the other farms.  This seems like a “duh” concept, but it is not always practiced in the area.  I certainly appreciate them for this.  Parking sounds like such a pathetic topic to even bring up, but believe you me, it can get crazy out there!

Finally, I just realized why even with all of these pluses, they don’t do a booming business.  Inside versus outside.  Most farm stands have tables outside, piled high with fresh foods that clearly call your name as you meander by.  Look at my lovely nectarines!  Yes, this watermelon wants to go home with you today!  We tomatoes are finally here and can’t wait to get reacquainted with you! But at the Tachella stand, everything is inside.  You just have to trust that its there and the foods will be delicious, which they always are.  I’m glad that I tucked inside last weekend, their last for the year, and found these adorable figs.  Time to cook!

Based on the recipe Grilled Sausage and Fig Pizza with Goat Cheese from Epicurious

Ingredients

Pomegranate Cumin Dressing

6  tablespoons extra-virgin olive oil
4  tablespoons white balsamic vinegar
3 tablespoons sliced fresh mint leaves
1 1/2 tablespoons pomegranate molasses
1 tablespoon ground cumin
6 tablespoons minced shallots
Fig Pizza
1 pound purchased fresh pizza dough
5 tablespoons Pomegranate-Cumin Dressing, divided
1 cup coarsely grated Fontina cheese
Fresh arugula
2 thin red onion slices, rings separated
6 fresh figs, quartered

Directions:

1.  Prepare dressing by whisking the ingredients together.  (The pomegranate molasses can be made by simmering 1 cup of pomegranate juice for 15 minutes.)

2.  Prepare barbecue (medium-high heat). Halve dough; roll to 10-inch rounds. Brush tops with some of dressing.

3. Grill pizzas, seasoned side down, until golden on bottom, about 4 minutes. Turn pizzas over. Top with Fontina, arugula,  figs, and onions. Drizzle with more dressing. Cover; grill until Fontina melts and pizza is cooked through, about 4 minutes.

Whisk first 5 ingredients in bowl. Mix in shallots; season with salt and pepper.

Notes:

  • I used prepared pizza dough from Trader Joe’s.  While the shape of the pizzas was, um, unique, the dough was certainly easy to work with and grill.
  • The original recipe called for sliced sausages.  I made the first pizza with the sausages and felt they just didn’t add anything to the dish.  The top photo has sausages just because it was the money shot.
  • This dressing is crazy delicious!!!
  • The original recipe added some goat cheese crumbles at the end of the cooking.  I didn’t want anything to compete with the figs and Fontina, so just omitted it.

Heirloom Tomatoes with Creamed Corn and Basil

Back in the recess of my mind, when conjuring up the basics for this blog, I figured that summer would take the cake.  You know, the endless visits to farm stands, the delicious dishes made from local foods, the interesting farmers to chat with.  And I do make endless trips to the farm stands and secretly feel sorry for those not as fortunate.  And I do make delicious dishes, but most tend to be slicing the veggies, adding perhaps some good salt and pepper, maybe cooking them quickly on the grill.  And the farmers are great, but they are in the midst of a crazy selling season and are just trying to keep their wits about them.   My mantra, especially in the summer, is “start with the best and don’t mess it up.”  While I don’t have full time foragers like Alice Waters, I do live just down the road from several of her favorite purveyors.  Living large while living local is so possible in my humble abode.

And then I saw this recipe that combined creamed corn with fresh tomatoes.  Perhaps Dante had a special level of hell for that.  But I read, I considered, I adapted, and I was convinced.  Consider this a substantial side dish, or a perfect main a bit of bread.

Corn and heirloom tomatoes from Smith Family Farms

Adapted from a recipe printed in The Week

Creamed Corn with Brie, Tomatoes, and Pine Nuts

Ingredients:

2 ears corn shucked, kernels removed

1/3 cup heavy cream

3 TBS brie, rind removed

freshly ground black pepper

1/4 cup pine nuts, lightly toasted

2 large tomatoes, thickly sliced

fresh basil, sliced

Directions:

1.  Combine corn kernels and cream in a saucepan over medium heat.  Cover and cook 5 minutes.  Uncover, stir, and cook for another 5 minutes.  Stir in brie cheese and pepper and cook until sauce thickens, about 5 more minutes.

2.  For each serving, start with a tomato slice, top with 2 TBS creamed corn, top with another tomato slice and more creamed corn.  Garnish with pine nuts and basil.

Notes:

  • Be sure to get a bit of basil in each bite!
  • The original recipe called for Gorgonzola for a “funky flavor that worked well” but I didn’t want anything that would complete with the corn and tomato, hence the brie.
  • Now I’m looking for a savory main to dress with this creamed corn.

Pickled Corn Relish

We’ve got corn coming out of our ears, and  no one is complaining.  Grilled corn, boiled corn, corn in casseroles and soups, corn on the cob and corn off the cob are all welcome when Brentwood Sweet Corn is in season.  Everyday we see corn fields that have been harvested and plowed, waiting for next year.  This local treat will run its course soon so we’re enjoying it as often as possible.

Corn tends to be a side dish, so when I spotted a recipe for corn relish in the San Francisco Chronicle, I was ready to give it a go.  There is a pickling process here, but do note that the resulting relish is still pretty sweet.  While not thrilled with this on some grilled chicken, the relish was quite tasty with a simple fish fillet and it was simply fantastic on a sheboygan sausage in a hoagie roll.   And while I’m generally not a relish type of person, this was nice on hand in the summer when simple grilled foods are the common theme at dinner time.  Oh, and don’t tell anyone, but a quarter cup of this stuff makes a nice little snack when no one is looking.  But let’s just keep that between us.

Corn and red bell pepper from The Farmer’s Daughter farm stand.

Pickled Corn Relish

adapted from the Pickled Pepper and Corn Relish recipe in the San Francisco Chronicle

Ingredients:

1 cup rice vinegar
1/4 cup sugar
1/2 cup water
4 teaspoons dried oregano
3 teaspoons ground cumin
2 tablespoons canola oil
3 cloves garlic, minced
2 large red peppers, seeded and diced
Kernels from 4 ears of corn
Kosher salt and ground black pepper, to taste

Directions:

1.  Bring the vinegar, sugar, water, oregano, and cumin to a low boil, reduce heat to simmer, and cook for 15 minutes.
2.  Heat the oil in a skillet, add the peppers, season with salt cook for 4 minutes or until the peppers just start to soften.  Add garlic and corn to the pan and cook for 2 minutes, stirring occasionally.
3.  Transfer corn mixture to a non reactive bowl, pour in the liquid and mix gently.  Cool to room temperature, cover, and refrigerate overnight.  Will keep for 5 days in the refrigerator.

Notes:

  • I cut back on the sugar in the original recipe, yet it was still sweeter than the term “pickled” implies.
  • This makes a ton of relish!  Next time I’ll cut the recipe in half.
  • While cooking the corn for just a bit is needed, I want to try this without cooking the red bell peppers, just to cut back on the sweetness.

Fly Off the Plate Deviled Eggs

Here we continue with the summer classics theme and the search for the perfect recipe.  To briefly recap, I finally had the “aha” moment, or perhaps the “duh” moment in realizing that the classic picnic foods are challenging to recreate because we have each had sampled several truly good versions and more than our fair share of barely passable versions.  Think of the last time you had some totally ho-hum potato salad and wished to be eating your favorite version.

Tasting a brand new to you dish that is delicious is considered delicious because its tasty and also because there is no benchmark comparison.  Compare that with the classics, such as when Aunt Millie always brings the deviled eggs to the BBQ because hers are the best, and you quickly realize how intimidating these simple dishes are.  Reputations are on the line here people!

So, I love eggs.  One egg scrambled with lots of veggies, or a nice little quiche, or deviled, or even poached (the test of a good diner line cook).  Somehow the Love for Deviled Eggs gene was not passed along to my children, so I only make them when we’re having friends over.  For a few years I made deviled eggs that made me sing, but no one ever took a second.  A bit of curry powder in the yolks?  Brilliant only in my mind.  Some horseradish perhaps?  Only I was pleased.  Extra parsley?  Cilantro?  Watercress?  No, no, and more no.  Finally I realized the obvious:  no one wants creativity in a classic at our backyard BBQ gatherings.

With a little guidance from Paula Deen, these Fly Off the Plate Deviled Eggs were created.  And I’ve never looked back.  In public.

Deviled Eggs

Ingredients:

8 large eggs, hard boiled and peeled
1/4 cup mayonnaise
2 TBS sweet pickle relish
1 1/2 tsp Dijon mustard
Salt and pepper, for taste
Paprika, for garnishing

Directions:

1.  Halve 8 eggs lengthwise. Remove yolks and place in a small bowl.

2.  Mash yolks with a fork and stir in mayonnaise, pickle relish, and mustard. Add salt and pepper, to taste.

3.  Fill egg whites evenly with yolk mixture. Sprinkle lightly with paprika.

Notes:

  • Do taste the mixture to make sure it is salted properly.  Salt makes a big difference in egg dishes.
  • I use the ol’ zip lock back trick for filling the egg whites.  Just scoop the yolk mixture into into a bag, cut off one corner, and use it like a pastry bag to fill the egg white shells.
  • Feel the need to add just a little more mustard?  Don’t.  These are perfectly balanced.
  • As for the “fly off the plate” in the title, yes, yes, yes they do!
  • Other classics posted on Livin Local: potato salad and “baked” beans

Grilled Corn with Marinated Tomatoes

With the opening of Lon’s Organic farm stand, summer is officially here!  The cool Spring made for a late crop of tomatoes but they are finally gracing us with their presence.  Living amidst endless plots of Brentwood Sweet Corn and tomatoes, we eat them daily while in season then go cold turkey during the off season.  Even living in the land of plenty, it is easy to depend on just a few go to recipes.  Truly, I am a master of the corn with black bean and tomato salads.  Yes, it makes for a delicious mixture and provides a healthy snack for the nibblers in the family.  (ok, that would be each of us!)  And yes, I do have a few variations, but I was ready for a new version to come into my life.  Thank you Gourmet for offering that subtle spark and rejuvenating my standard side dish.  And thank you t0 Gourmet Unbound for nudging me towards this delish variation.

Grilled Corn with Marinated Tomatoes

Corn from Farmer’s Daughter, tomatoes from Lon’s

inspired by Corn and Tomato Scramble

Gourmet  July 2009

Ingredients:

2 TBS extra virgin olive oil

2 TBS rice vinegar

1/2 tsp kosher salt

3/4 tsp freshly ground black pepper

1 1/4 pounds tomatoes, cut into bite size pieces

4 green onions

6 ears corn, shucked

Directions:

1. Whisk together oil, vinegar, salt and pepper.  Add tomatoes, mix gently, and set aside.

2.  Heat grill to medium high.  Grill green onions and corn until each are slightly charred.  Remove from grill and allow to cool.  Cut kernels from corn cobs and slice green onions into 1/4 inch pieces.  Add to marinated tomatoes and mix gently.  Serve cooled or at room temperature.

Notes:

  • With seasonal ingredients, this is simply delicious!
  • I tend to go heavy on the black pepper with tomatoes, so hold back if that is not your personal bent.
  • The original recipe actually required you to dirty a pan.  Obviously that needed to be changed.
  • Yes, those are people fishing in our back yard.  Life on the lake is not for those requiring their home to be a sanctuary of privacy.

Cold Noodle Salad

Washington DC and New York City.  For years, my husband has lead a group of 8th graders to these fine cities for a one week whirlwind tour.  And yes, we have the souvenirs to prove it.  It started with the typical stuff, such as I heart NY T-shirts, moved on to wine and food goodies, and then onto gorgeous detailed Christmas ornaments from Mount Vernon and other presidential collections.  Trip after trip he would announce, “just one more year, then I’m handing off the trip to someone else.”  That finally happened.  Of course, the new leader decides it would be beneficial to have some of that second hand experience along for the journey and asked me to chaperone.  So, there I was, flying across the country with the most amazing group of teens you ever did see.  And, I needed to bring home some souvenirs.  Shopping for the kids and hubby was actually quite fun.  But I also wanted something for myself.  That same self that has been the happy recipient of souvenirs from these exact same places for years.

It was time to get off the beaten path.  We were in China Town, NYC.  The kids had specific guidelines to stay on the main street for their shopping.  So, I wandered.  And I found it.  A shop just like Ollivander’s Wand Shop in Harry Potter where he buys his famous wand.  It was just a little slip of a store, filled with small boxes from floor to ceiling, with one helpful gentleman to guide me through the options.  Chopsticks.  The options were mind boggling:  plastic or wood, types of wood, inlaid or painted designs, 3 sided or octagons, blunt or pointed tips, pairs or sets.

With a new set of chopsticks in hand, I headed home to California, ready for a beat the heat meal friendly to chopsticks.  And No Recipes posted this cold noodle dish seemingly just for the occasion.  This dish includes his noodles and dressing with toppings that just sounded good to me at the time.  Enjoy!

Cold Noodle Salad with Fresh Vegetables

Ingredients:

16 oz fresh ramen or chow mien noodles

2 scallions, finely sliced

1/2 English cucumber, sliced into 3 inch by 1/4 inch pieces

1/2 cup shredded imitation crab

1/2 cup snow peas, julienned

2 crimini mushrooms, sliced

3 TBS sesame oil

1 TBS garlic, minced

1 tsp ginger, minced

3 TBS rice vinegar

2 TBS soy sauce

2 TBS toasted sesame seeds

1 TBS sugar

Directions:

1.  Prepare dressing by mixing sesame oil, garlic, ginger, rice vinegar, soy sauce, toasted sesame seeds and sugar in a small mixing bowl.

1. Cook noodles according to directions.  Rinse with cool water and drain well.  Add to dressing and mix until noodles are evenly coated.

3. Portion noodles into serving dishes and top with crab and vegetables.

Notes:

  • This was both yummy and fun.  Yummy because each person can choose their own toppings.  Fun because we used the new chopsticks!
  • The original recipe called for an egg component that was fun to make, but the texture matched the noodles to much for my taste.  While I omitted the eggs in the end, you may find them enjoyable in your version.
  • Fresh noodles are best here.  Do not use the ramen noodles from those little soup packages.
  • If you have some noodles around, this is a great summer time “clean out the fridge” or “finish up the farmer’s market purchases” type of meal.
  • Did I mention the yummy part?  I made a decent sized batch, and the leftovers disappeared quickly.  Always a good sign!

Mini Cherry Muffins

Previously, cherry season pretty much passed me by before I even knew it was here.  Other local produce tends to arrive, hang out for an extended chat, and slowly move on its way.  Its like really enjoying a song on your iPod, then seeing the band in concert and they stretch out the music with the perfect guitar solo.  The local corn, peppers, tomatoes, squash are old school rock and roll.  Cherries are more punk rock.  You see the trees, the blossoms, the gorgeous cherries hanging from the branches by the hundreds.  Finally, families open the orchards for business and bam!  its over before you know it.  One super sonic punk number going full throttle, then  disappearing off stage.

Here’s your chance to make some punk rock cherry muffins before the season’s over.

Cherries from Seko Ranch.

Mini Cherry Muffins

Ingredients:

1 3/4 cup all purpose flour

2 tsp baking powder

1 tsp baking soda

1/2 tsp salt

1/3 cup butter, softened

1/3 cup brown sugar, packed, plus a few TBS more for sprinkling on the muffins

1/3 cup granulated sugar

1 egg

1 cup buttermilk

1 cup cherries, pitted and chopped

Directions:

1.  Preheat oven to 400 degrees.  Lightly grease 24 mini pan or place paper inserts into cups.

2.  In a medium mixing bowl, sift together the flour, baking powder, baking soda, and salt.

3.  In a large mixing bowl, cream together the butter, 1/3 cup of brown sugar, and the granulated sugar.  Beat until light and fluffy.

4.  Beat in the egg then the buttermilk and mix well.  Add the flour mixture into the buttermilk mix and stir until just blended.  Fold in the cherries.

5.  Spoon the batter into the muffin cups. Sprinkle with brown sugar.  Bake in the preheated oven for 12 minutes or until they pass the clean toothpick test.

Notes:

  • This recipe came from the tried and true method of looking in the fridge and pantry, checking recipes, and just figuring out what should work.
  • The next time I make these, I’ll go for regular size cupcakes so there is a better proportion of fluffy parts to crusty parts.
  • Hint:  do not chop cherries wearing khakis.  🙂
  • A great resource for those in the California bay area wanting to pick cherries is Brentwood Cherries.

Asparagus Asparagus and Sausage Strata

Have you ever had one of those work projects where the forward motion of the whole train depended on a few key people?  You have great admiration and respect for these people who keep everything at work running smoothly, and the whole mojo of the project depends on their first impression?  The kind of project where these key people have to rearrange their own work days, find people to cover for them, be ready to learn more skills than mere mortals can absorb in a day, and then return to their regular posts to find out what catastrophes graced their work places that still need to be cleaned up?  That kind of project.  At times like this, food is essential.  Nothing says “you are appreciated” first thing in the morning than a home made breakfast.

The food was perfect, the project well received, and everyone is on board with the project.  “nuff said.

Breakfast stratas are perfect for sharing because they can be made the night before, feed a crowd, and are simply delicious!  This recipe is a combination created from a standby recipe I have used for years that frankly has way too much cheese, a few ideas found in other blogs, and the fact that I had lots and lots of asparagus on hand.  As has been my bent lately, I upped the veggies and cut way back on the grated cheese.  This is also the first time I tried ricotta in a strata.  I had some in the fridge and it just sounded good.  The ricotta turned out to be a perfect match with the asparagus as it didn’t overpower the flavor.  When a dish has double asparagus in its name, you darned well better be able to taste asparagus!

Asparagus and onions from Tachella Family Farm, strawberries on the side from “The Stand on the Corner” as we call it around here.

Asparagus Asparagus and Sausage Strata

serves 10 to 12

Ingredients:

8 large eggs

2 1/2 cups skim milk

1 pint skim ricotta cheese

5 green onions, sliced including greens

1 cup Swiss cheese, grated

1/2 cup Parmesan cheese, grated

1 pound spicy Italian sausage, casings removed

2 bunches asparagus, ends trimmed, and cut into 2 inch pieces

1 1/2 loaf french bread, sliced

salt and pepper to taste

1/4 tsp Paprika

Directions:

1.  Coat 13 x 9 inch pan with spray oil.

2.  Cook sausages in a skillet, breaking up the meat into small bits.  When the sausage is almost cooked through, move it to one side of the skillet and add the asparagus. Continue cooking until the sausage is cooked through and the asparagus just starts to brown.  Remove from heat and let cool slightly.

3. In a large mixing bowl, whisk together the eggs, milk, ricotta, green onions, salt and pepper.

4.  Prepare the strata by layering half of the bread slices in the baking pan, sprinkle with half of the sausage and asparagus mixture, and then with half of the Swiss and Parmesan cheeses.  Repeat layering.  Slowly pour egg mixture over the layers, making sure all of the bread is moistened.  Stop adding liquid when it reaches 1/2 inch below the rim of the pan.  Cover with foil and refrigerate overnight.

5.  Bake the next morning uncovered for one hour in a 350 degree oven.  Remove from oven and sprinkle with Paprika.

Notes:

  • The amount of bread and liquid needed will depend on the type of pan you use.  A metal baking pan seems to hold an endless amount of food, while the stoneware pans hold less.  You may not need all of the liquid called for in the recipe.
  • This is a very flexible recipe!  Swapping out the asparagus for another veggie and the sausage for another meat works well.
  • I bought my cheese from my favorite supermarket … the one with the huge variety of vegetables, peppers, and lentils.  It wasn’t that flavorful.  Next time I’ll be sure to get at least some decent cheese.

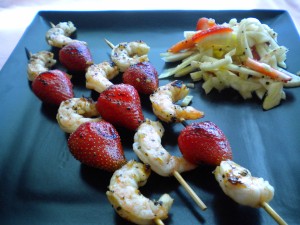
Grilled Strawberry and Shrimp Skewers with Fennel Slaw

Its summer time and the livin’ is easy.  Time to pull out those quick and light recipes that are just good, good, good to have on hand.  Last weekend, while dog sitting for some friends, I took a few minutes to relax with their cookbooks.  You know when you see a recipe that is just off kilter enough that it has to be either a big hit or a major bomb?  That’s exactly what went through my mind when I saw this.  Strawberries on the grill?  Really?  Really!

Grilling the strawberries doesn’t do anything magnificent to enhance the flavor, but it softens the berries which is a great textural contrast with the shrimp and fennel.  And, its just a nice change of pace.  The vinaigrette is a total keeper with its balance of sweet and bitter.  I’ll be looking for more ways to use this little ditty.

Grilled Strawberry and Shrimp Skewers with Fennel Slaw

adapted from California Home Cooking by Michele Anna Jordan

Ingredients:

Skewers

10 bamboo skewers, soaked in water for 30 minutes

20 to 30 prawns, at least 30U in size

2 baskets of strawberries, divided

1 cup Honey Pepper Vinaigrette  (recipe below)

1 small fennel bulb, trimmed and sliced thin

1 TBS mint leaves, julienne

Vinaigrette

3 TBS rice vinegar

3 TBS balsamic vinegar

1/4 cup honey, warmed

1 shallot, minced

3 garlic cloves, minced

1 TBS freshly ground black pepper

1 tsp kosher salt

1/2 cup olive oil

Directions:

1.  Prepare the vinaigrette by mixing the vinegars and honey in a bowl, then stirring in the shallots, garlic, pepper and salt.  Whisk in the olive oil slowly until incorporated.

2.  Prepare a hot fire on the grill.

3.  Thread each skewer with 3 prawns and 2 whole strawberries.  Brush lightly with vinaigrette  on each side and place them on the grill.  Turn the skewers after 2 minutes and bush again with the vinaigrette.  Continue cooking until the prawns are pink and no longer translucent on the inside, about 2 more minutes.

4.  Add the mint to the remaining vinaigrette.  Quickly toss together the remaining strawberries, sliced, and the fennel, along with 1 to 2 TBS of the vinaigrette.

5.  Serve the shrimp and strawberry skewers alongside the fennel and strawberry slaw.

Notes:

  • This vinaigrette on the shrimp was simply magnificent!
  • Not being the biggest fan of fennel, I think the next time Napa cabbage may be a good substitute for the fennel.  It does have to be something with some crunch and heft.  Butter lettuce would not hold its own in this dish.