Tag Archives: Vegetarian

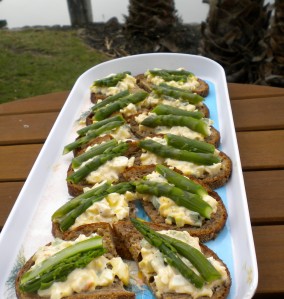
Egg and Asparagus Open Faced Sandwiches on Rye

“Oh!” they proclaim.  Eggs and asparagus are the absolute taste of Spring.  Eggs and asparagus are the quinsential coupling of the season.  “They” said so, but I had not indulged.

In my world, eggs and asparagus belong in completely different groups.  Asparagus is in the Prepare it Simply and Resist Any Urge to Add Anything That is Clearly Not Necessary group.  Also in this group are steaks, salmon, peaches, and blueberries.  Eggs are in the Salsa Always Served With This category.  Other items in this group are tortilla chips, and, well, eggs.

In the end, the rye bread did add a bit of oomf to this dish.  The eggs are basically deviled eggs without the relish with the egg whites minced ever so sweetly.  Its a nice little Sunday brunch kind of thing while totally breaking all of my previous rules.

Egg and Asparagus Open Faced Sandwiches on Rye

Ingredients:

  • 7 eggs, boiled and peeled
  • 1/4 cup mayonnaise
  • 1 tsp dijon mustard
  • 2 TBS parsley finely chopped (optional)
  • salt and pepper
  • 8 slices thinly sliced rye or other dark bread, cut in half
  • 8 spears asparagus

Directions:

  1. Halve eggs, put the yolks in a bowl and mince the whites.  To the yolks, add the mayonnaise and dijon mustard.  Mix, and fold in whites, then parsely if desired.  Salt and pepper to taste.
  2. Set a pot of salted water to boil while slicing the asparagus spears into thirds.  Place asparagus into boiling water for 2 minutes, drain in a collander and rinse with cold water until cool.  If the spears are thick, cut each in half lengthwise.
  3. Lightly toast the bread under the broiler, then top with egg mixture and top with 2 pieces of asparagus.

Notes:

  • These are oh, so pretty.
  • The main idea here is the egg spread, asparagus, and bread.  Play with the parts as you see fit.
  • Rye bread was one of those foods I just decided that I didn’t like as a kid.  Then one day I took a personal field trip to Berkeley’s Gourmet Ghetto and had a pastrami on rye at Saul‘s.  Life changing!

Spice of Life Vegetarian Sandwiches

How do you know that your sandwich totally rocks?  Why, of course, by sitting down at the lunch table at work, pulling out a sandwich that is technically a left over from dinner the night before, and coworkers’ jaws dropping with jealousy.  Fortunately, I work with a healthy bunch who all love a good meal.  Lunch discussions are more about current events, political ideology, local foods, and our profession in general, than anything found in People magazine or at TMZ.  Personally, this suits me well.

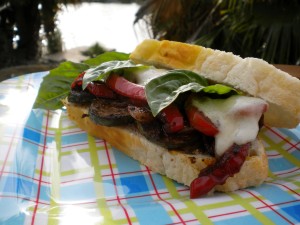
Back to the sandwich.  This little ditty is a breeze to make.  Simply combine the marinade ingredients and sliced veggies in a zip-lock bag and leave it on the counter.  Take a break from that amazing challenging task (tee-hee) while the marinade does its magic.  Finally, do a quick cook in the pan, assemble, and devour.  This is not the “oh my goodness, this IS spicy” kind of spicy like the grilled vegetable sandwich recipe, but rather the sweet on the front of the tongue followed by a delightful slow burn in the back of the mouth kind of spicy.

Spice of Life Vegetarian Sandwiches

makes 4 sandwiches

Ingredients:

  • 1/4 tsp each: salt, thyme, cinnamon, allspice, cayenne pepper, Chinese 5 spice powder, ground black pepper
  • 1 teaspoon red wine vinegar
  • 1 teaspoon olive oil
  • 2 zucchini, sliced into 1/4 inch rounds
  • 1/2 medium red onion, cut into 1/4-inch-thick slices
  • 1 large red bell pepper, cut into 1/4-inch-thick slices
  • Cooking spray
  • 1 teaspoon light mayonnaise
  • 8  slices  French bread
  • Mozzarella or Jack cheese slices
  • basil leaves

Directions:

  • Combine spices, vinegar and oil in a large zip-top plastic bag and mix together. Add zucchini, onion, bell pepper,seal and shake well to coat. Let stand 30 minutes, or refrigerate overnight.
  • Heat a skillet over medium high heat.  Coat with cooking spray.  Dump the contents of the bag into the pan and cook until the vegetables are tender, about 5 minutes.
  • Preheat broiler.
  • Divide sauteed vegetables among 4 french bread slices.  Top each with a slice of cheese.  Broil until cheese softens, about 1 minute.  Add remaining bread slices to the baking sheet and broil for 1 more minute or until the cheese melts and the bread browns, then lightly spread with mayonnaise.  Top cheese with basil leaves and toasted bread.

Notes:

  • Feel free to be pretty flexible with the veggies in here.  Any kind of squash or some eggplant would be perfect.
  • I totally like to snack on left overs.  These veggies are best in sandwiches and just don’t work well with casual “let me nibble on a few bites of zucchini” snacking style.
  • There are just enough juices to soak into the bread, providing some extra love.
  • If you clicked over to the grilled vegetable sandwich, you’ll notice how much the palm trees in the back yard have grown over the years.  There are 3 palms, with one of the three being a trio itself.  When we bought them about 5 years ago, they all fit in the back of our SUV.  Believe it or not!

Heirloom Tomatoes with Creamed Corn and Basil

Back in the recess of my mind, when conjuring up the basics for this blog, I figured that summer would take the cake.  You know, the endless visits to farm stands, the delicious dishes made from local foods, the interesting farmers to chat with.  And I do make endless trips to the farm stands and secretly feel sorry for those not as fortunate.  And I do make delicious dishes, but most tend to be slicing the veggies, adding perhaps some good salt and pepper, maybe cooking them quickly on the grill.  And the farmers are great, but they are in the midst of a crazy selling season and are just trying to keep their wits about them.   My mantra, especially in the summer, is “start with the best and don’t mess it up.”  While I don’t have full time foragers like Alice Waters, I do live just down the road from several of her favorite purveyors.  Living large while living local is so possible in my humble abode.

And then I saw this recipe that combined creamed corn with fresh tomatoes.  Perhaps Dante had a special level of hell for that.  But I read, I considered, I adapted, and I was convinced.  Consider this a substantial side dish, or a perfect main a bit of bread.

Corn and heirloom tomatoes from Smith Family Farms

Adapted from a recipe printed in The Week

Creamed Corn with Brie, Tomatoes, and Pine Nuts

Ingredients:

2 ears corn shucked, kernels removed

1/3 cup heavy cream

3 TBS brie, rind removed

freshly ground black pepper

1/4 cup pine nuts, lightly toasted

2 large tomatoes, thickly sliced

fresh basil, sliced

Directions:

1.  Combine corn kernels and cream in a saucepan over medium heat.  Cover and cook 5 minutes.  Uncover, stir, and cook for another 5 minutes.  Stir in brie cheese and pepper and cook until sauce thickens, about 5 more minutes.

2.  For each serving, start with a tomato slice, top with 2 TBS creamed corn, top with another tomato slice and more creamed corn.  Garnish with pine nuts and basil.

Notes:

  • Be sure to get a bit of basil in each bite!
  • The original recipe called for Gorgonzola for a “funky flavor that worked well” but I didn’t want anything that would complete with the corn and tomato, hence the brie.
  • Now I’m looking for a savory main to dress with this creamed corn.

Jalapeno Hot Sauce

You know it is a cool summer when the peppers at the farm stands call out your name while those tomatoes take their sweet little time ripening.  Cool weather plus slowly ripening crops leads to crazy foodie behavior, such as making hot sauce in the summer.

This was my first go at making hot sauce, and it is certainly something I’ll do again.  It was crazy simple to do and the fresh flavors are perfect for adding a bit of kick to eggs, quesadillas, and an endless array of finger foods.

Jalapeno Hot Sauce

adapted from the totally amazing Border Cookbook by Cheryl Alters Jamison and Bill Jamison

Peppers and onion from Smith Family Farm

Ingredients:

8 fresh jalapenos, stemmed and cut into fourths

1 Anaheim chile, stemmed and cut into fourths

1 cup white vinegar

1/2 cup water

2 TBS pepitas, toasted

1/2 tsp cumin seeds, toasted

2 TBS diced onion

6 garlic cloves

1 1/2 tsp salt

1/2 tsp dry mustard

Directions:

1.  Place all of the ingredients in a blender and puree for two minutes, until the sauce is smooth but still a little grainy.  Refrigerate the sauce for at least 8 hours.

2.  Re-blend the sauce and strain it into bottles.

Notes:

  • I used almonds because I forgot to get pepitas at my regular grocery store, and my local store still doesn’t carry them.  Grrrr.  The almonds gave it a nice texture, even after the straining.
  • Do you like those cute bottles?  About two years ago, I got the great idea to make cranberry infused vodka for a little gift for coworkers.  It didn’t turn out well at all.  Guess I need to go back and work on my vodka infusions.  Oh, what a rough life!
  • If you’re ever needing a totally reliable cookbook on Tex-Mex or border style barbecue, you just cannot go wrong with anything by the Jamisons.

Fly Off the Plate Deviled Eggs

Here we continue with the summer classics theme and the search for the perfect recipe.  To briefly recap, I finally had the “aha” moment, or perhaps the “duh” moment in realizing that the classic picnic foods are challenging to recreate because we have each had sampled several truly good versions and more than our fair share of barely passable versions.  Think of the last time you had some totally ho-hum potato salad and wished to be eating your favorite version.

Tasting a brand new to you dish that is delicious is considered delicious because its tasty and also because there is no benchmark comparison.  Compare that with the classics, such as when Aunt Millie always brings the deviled eggs to the BBQ because hers are the best, and you quickly realize how intimidating these simple dishes are.  Reputations are on the line here people!

So, I love eggs.  One egg scrambled with lots of veggies, or a nice little quiche, or deviled, or even poached (the test of a good diner line cook).  Somehow the Love for Deviled Eggs gene was not passed along to my children, so I only make them when we’re having friends over.  For a few years I made deviled eggs that made me sing, but no one ever took a second.  A bit of curry powder in the yolks?  Brilliant only in my mind.  Some horseradish perhaps?  Only I was pleased.  Extra parsley?  Cilantro?  Watercress?  No, no, and more no.  Finally I realized the obvious:  no one wants creativity in a classic at our backyard BBQ gatherings.

With a little guidance from Paula Deen, these Fly Off the Plate Deviled Eggs were created.  And I’ve never looked back.  In public.

Deviled Eggs

Ingredients:

8 large eggs, hard boiled and peeled
1/4 cup mayonnaise
2 TBS sweet pickle relish
1 1/2 tsp Dijon mustard
Salt and pepper, for taste
Paprika, for garnishing

Directions:

1.  Halve 8 eggs lengthwise. Remove yolks and place in a small bowl.

2.  Mash yolks with a fork and stir in mayonnaise, pickle relish, and mustard. Add salt and pepper, to taste.

3.  Fill egg whites evenly with yolk mixture. Sprinkle lightly with paprika.

Notes:

  • Do taste the mixture to make sure it is salted properly.  Salt makes a big difference in egg dishes.
  • I use the ol’ zip lock back trick for filling the egg whites.  Just scoop the yolk mixture into into a bag, cut off one corner, and use it like a pastry bag to fill the egg white shells.
  • Feel the need to add just a little more mustard?  Don’t.  These are perfectly balanced.
  • As for the “fly off the plate” in the title, yes, yes, yes they do!
  • Other classics posted on Livin Local: potato salad and “baked” beans

Grilled Corn with Marinated Tomatoes

With the opening of Lon’s Organic farm stand, summer is officially here!  The cool Spring made for a late crop of tomatoes but they are finally gracing us with their presence.  Living amidst endless plots of Brentwood Sweet Corn and tomatoes, we eat them daily while in season then go cold turkey during the off season.  Even living in the land of plenty, it is easy to depend on just a few go to recipes.  Truly, I am a master of the corn with black bean and tomato salads.  Yes, it makes for a delicious mixture and provides a healthy snack for the nibblers in the family.  (ok, that would be each of us!)  And yes, I do have a few variations, but I was ready for a new version to come into my life.  Thank you Gourmet for offering that subtle spark and rejuvenating my standard side dish.  And thank you t0 Gourmet Unbound for nudging me towards this delish variation.

Grilled Corn with Marinated Tomatoes

Corn from Farmer’s Daughter, tomatoes from Lon’s

inspired by Corn and Tomato Scramble

Gourmet  July 2009

Ingredients:

2 TBS extra virgin olive oil

2 TBS rice vinegar

1/2 tsp kosher salt

3/4 tsp freshly ground black pepper

1 1/4 pounds tomatoes, cut into bite size pieces

4 green onions

6 ears corn, shucked

Directions:

1. Whisk together oil, vinegar, salt and pepper.  Add tomatoes, mix gently, and set aside.

2.  Heat grill to medium high.  Grill green onions and corn until each are slightly charred.  Remove from grill and allow to cool.  Cut kernels from corn cobs and slice green onions into 1/4 inch pieces.  Add to marinated tomatoes and mix gently.  Serve cooled or at room temperature.

Notes:

  • With seasonal ingredients, this is simply delicious!
  • I tend to go heavy on the black pepper with tomatoes, so hold back if that is not your personal bent.
  • The original recipe actually required you to dirty a pan.  Obviously that needed to be changed.
  • Yes, those are people fishing in our back yard.  Life on the lake is not for those requiring their home to be a sanctuary of privacy.

Go-to Mango Jicama Chopped Salad

Everyone needs a “go to” dish or two.

Need to bring something to a pot luck or block party?  Toss together your “go to” dish.  Having friends over for a BBQ and need that one delicious dish that can be made that morning and stashed in the fridge?  “Go to” dish.

No need to browse all of your cookbooks or favorite blogs over and over for that one dish that is simple to make and is certain to please the crowd.  Save that for a leisurely day.

This Winter, my dish was a salad with sweet dried cranberries, crunchy tart apples, and savory blue cheese tossed with mixed greens.  It was easy to make, the ingredients are easy to find, and oh my was it a crowd pleaser.

The new “go to” dish is mango jicama chopped salad.  This is super easy to prepare, can be stored for several hours, and most importantly tastes fantastic.  It pleased my crowd and is sure to please yours, too.   Enjoy!

Mango Jicama Chopped Salad

adapted from Gourmet, January 2000

Ingredients:

Dressing

1/4 cup fresh lime juice

2 TBS honey

1 TBS rice vinegar

1 tsp garlic, minced

1/4 cup olive oil

Salad

2 cups jicama, peeled and chopped

2 mangoes, pitted, peeled and coarsely chopped

1/2 pound Napa cabbage, sliced crosswise

1/2 seedless cucumber, cut into wheels and quartered

Directions:

1.  Make dressing by pulsing together lime juice, honey, vinegar, and garlic in a mini food processor.  Add oil in a slow stream until emulsified.  Season lightly with salt and pepper.

2.  Toss together jicama, mangoes, cabbage, and cucumber.  Gently mix with dressing to taste.

Notes:

  • After mixing together the jicama, mangoes and cucumber, I was hesitant to add the Napa cabbage.  Those 3 ingredients just looked so perfect on their own.  After scooping some into a smaller bowl and adding the cabbage, it was clear that the salad is much improved by its presence.
  • The original recipe calls for romaine lettuce also.  The double batch I made filled the bowl, so the romaine just didn’t get invited to the party.
  • 1 cup of toasted pumpkin seeds was also in the recipe and the notes  online by other cooks loved them.  Unfortunately, I had shopped at our local store, not the good store in the next town.  No pepitas were to be found.  One more reason in a long string of reasons to avoid that store whenever possible.
  • A big shout out to my wonderful Father-in-Law, my sous chef!

Asparagus and Shiitake Quiche

Oh, the asparagus has arrived!  This time of year brings with it great anticipation.  Asparagus harvested up the road means that the corn and tomatoes are being planted and that the strawberry fields will soon be ready for U-pick and then the whole summer will open up with an abundance of fresh local fare.  The asparagus always leads the band.

This lovely little dish is based on the asparagus and moral quiche recipe in the April edition of Sunset magazine based on what was hanging out in the pantry.

Asparagus and Shiitake Quiche

Ingredients:

2 frozen pie shells

4 eggs

1 pkg fresh shiitake mushrooms

3 cups thick asparagus spears, cut in 2 inch pieces, stalks split in half

3 cups half and half

1 1/2 tsp salt

1 tsp white pepper

1 tsp Coleman’s mustard

1 1/2 cups provolone cheese, grated

2 green onions, finely chopped, optional

Directions:

1.  Prepare pie shells according to directions.  Preheat oven to 375 degrees while allowing the pie shells to cool.

2.  Blanch asparagus in a saucepan of boiling water until barely tender-crisp, about 45 seconds.  Drain in a colander and gently rinse with cold water to stop the cooking process.  Drain and pat dry.

3.  Remove stem tips from mushrooms and slice into 1/4 inch pieces.

4.  In a bowl, whisk eggs half and half, salt, white pepper, and mustard to blend.  Sprinkle provolone and green onions in the prepared crusts, dividing evenly.  Arrange the asparagus and mushrooms in the pie crusts, again dividing evenly.  Pour egg mixture over vegetables.

5.  Bake quiche on bottom rack until filing no longer jiggles when gently shaken, 40 to 45 minutes.  Let cool in pan on a rack at least 30 minutes.  Serve warm or at room temperature.

Notes:

  • The original recipe called for gruyere cheese which would be delicious in the recipe.  Provolone made it into mine due to the “clean the pantry” concept.
  • Yes, you can make your own crust.  And if you do, feel free to gloat.
  • Honestly, I’ve never had a morel mushroom, but they just didn’t look yummy in the magazine photograph.  And, I’d just picked up some fresh shiitakes at the store just because they were fresh and not dried.  Choose your favorite mushroom and use it without worry.
  • The recipe was expanded for two quiches simply because there were two pie shells in the package and an ample supply of ingredients were in the pantry.  It can be halved for just one quiche easily.

Lightish Stuffed Manicotti

Lightish.  Gotta love that the indecision.  Yes, I want to make a rich pasta dish with Alfredo sauce, but don’t want it to have too many calories.  Typical female.  This was my first go at manicotti.  It is just so different from the standard spaghetti that it put fear in my heart for years.  And while a few lessons were learned, it will take a few more trips around the park to get that pasta stuffing technique perfected.  The stuffing is based on a stuffed shells recipe from Southern Living and the Alfredo sauce is based on a recipe comment that suggested using fat free half and half with a bit of flour instead of the whipping cream.  Like I said, its lightish.

Yes, the sauce in the picture is broken.  Perhaps its time to make an ugly picture category for the blog!  But, there’s a story behind that.  With all of the stress in my vocation and location due to the economy, and following two nights of “informational meetings” I was so stressed that the only way to get out of it was to go on a cooking bender.  Everyone has their own way to handle stress, and an all out “leave me along and let me cook” marathon is a reliable tool in my repertoire.  Naturally, time needed for each dish was completely underestimated.  Typical.  In the end, all of the prep work, including the Alfredo sauce,  was completed in one evening, with the 5 family sized dishes assembled the next day.  Food to share, food to freeze, food to ease burdens.  And in the end, the cooking bender did soothe my frazzled nerves.  Ahhhhhh.

Lightish Stuffed Manicotti

Manicotti ingredients:

1 box manicotti shells

2 packages frozen chopped spinach, thawed and drained

2 cups diced chicken (optional)

1 TBS fresh basil, chopped

16 oz low fat cottage cheese

1 egg, beaten

1/4 cup Parmesan, grated

1/4 tsp nutmeg

Alfredo Sauce ingredients:

1/2 cup butter

1 1/4 cups fat free half and half

2 TBS flour

3/4 cup Parmesan, grated

1/4 tsp nutmeg

1 clove garlic, finely diced

Directions:

1.  Preheat oven to 350 degrees.

2.  Drain chopped spinach well, pressing between paper towels.

3. Stir together spinach, chicken, basil, and next 4 ingredients.  Set aside.

4.  Prepare Alfredo sauce by melting butter in a sauce pan, add remaining ingredients, and lightly whisk until cheese is melted and sauce is smooth.  Continue stirring over low heat for 5 minutes or until sauce thickens slightly.

5.  Cook manicotti shells according to directions on the box, and remove to a plate.

6.  Spread 1 cup Alfredo sauce on the bottom of a 9 by 13 pan.

7.  Either put spinach filling in a gallon size plastic bag and cut the corner off to use for filling each manicotti shell, or gently fill pasta tubes with a teaspoon.  Lay the manicotti on the alfredo sauce.

8.  Top with remaining sauce.

9.  Bake, covered, at 350° for 40 to 45 minutes or until filling is hot and sauce is bubbly. Remove from oven, and let stand 10 minutes.

Notes:

  • This can be prepared through step 8, then covered and frozen for 1 month.
  • I made one batch with chicken and one without.  Both were equally yummy.
  • When stuffing the manicotti tubes, I went back and forth between the plastic bag method and the spoon method.  Next time I may need to just find more patience.
  • Slightly under-cooking the pasta helped keep the tubes from splitting open.

A Nice Little Roasted Veggie Sandwich

Everyone seems to be into this 30 minute meal craze.  The goal in this race is to see how quickly a person can get dinner on the table.  Bonus points are awarded for a well balanced meal.  Double bonus points go to using fresh ingredients in the 30 minute well balanced meal.  Triple points are awarded to doing all that without using half the pots and pans in your kitchen!  To be frank, I’ve tried a few of these and been disappointed.  But, I have learned a few tricks from the ever present Rachael Ray and Cooking Light’s Fresh Food Fast book.  Here we go, in no particular order:

  • keep it simple
  • add a punch of flavor somewhere
  • grill whenever possible

This little weeknight sammie lives up to all three tricks.  First, its a sandwich, which keeps it simple.  The Parmesan mayo with a healthy dose of garlic punches up the flavor and could easily be reworked into a dip.  And finally, keeping a gas grill right outside our kitchen makes year round grilling a breeze.  Several of the Cooking Light recipes have you spritz some salad spritzer on the veggies before grilling, and this is easily one of the best little secrets ever.  Its like the perfect little flavorizer in a spray bottle, and I have used that shortcut year round with great success on all kinds of grilled veggies.

Grilled Portobello Sandwich with Parmesan Mayonnaise

makes 4 sandwiches

Ingredients:

2 Portobello mushrooms

1 red bell pepper

4 lettuce leaves

Balsamic salad spritzer

8 slices sourdough bread

1/2 cup Parmesan mayonnaise

Parmesan Mayonnaise

1/2 cup light mayonnaise

2 cloves garlic, pressed

2 TBS grated Parmesan cheese

2 TBS red onion, minced

1/4 tsp black pepper

Directions:

1.  Heat grill or broiler.

2.  Prepare Parmesan mayonnaise by combining the light mayo, garlic, Parmesan, onion, and black pepper in a bowl.  Refrigerate.

3.  Remove stems from mushrooms and spray bottoms of caps with balsamic spritzer.

4.  Place mushrooms on the grill.  Turn after 7 minutes, or when browned and tender.  Remove from grill, and slice into 1/2 inch sections.

5.  Assemble sandwiches by spreading 1 tablespoon Parmesan mayonnaise onto each bread slice.  On 4 of the bread slices, layer portobello mushroom slices, red bell pepper sections, lettuce leafs, and top with the other pieces of bread.

Notes:

  • This Parmesan mayonnaise is really, really good!
  • To roast a bell pepper, place it on the grill over direct heat and turn when each side chars.  When all sides are charred, place the bell pepper in a plastic bag, twist the top of the bag to seal in the heat, and let it sit for ten minutes.  Finally, take the bell pepper out of the bag and slide the charred skin off the sides and remove the stem and seeds.  Cut into sections.
  • You can use what ever type of sandwich bread you choose of course.  Sourdough is simply my favorite.
  • Grilling the bread gives an extra bit of love to the sandwich.
  • Yes, roasted red bell peppers are available in jars in the store.  But … I’m just too frugal to spend 6 bucks on peppers.
  • This is easily adapted to making under the broiler.