Category Archives: Cooking

Winner Winner Buffalo Chicken Sammie Dinner

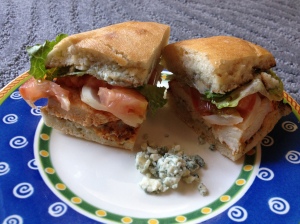
IMG_1828 All of those 4 or 5 or 6 or under 10 ingredient meals are so alluring.  Just think, with a very few items you too can make scrumptious meals.  But the ones I’ve tried end up being so blah that its easy to return to (still) simple preparations with a few more ingredients to punch up the flavors.  This flavorful buffalo chicken sandwich takes the cake for simple recipes with loads of flavor.

Buffalo Chicken Sandwich

(inspired by this recipe)

Ingredients:

1/4 cup Franks hot sauce

2 chicken breasts, sliced into 1/2 inch thick “steaks”

1/2 cup crumbled blue cheese

3 TBS lite mayo (or more as needed)

lettuce

tomato, sliced

onion, sliced

4 ciabatta rolls, split

Directions:

1.  Combine 2 TBS hot sauce with 1 TBS softened butter, mix and set aside.

2.  Combine blue cheese and lite mayo.  Set aside.

3.  Combine remaining hot sauce with chicken and let marinade while you start up the grill.  Grill the chicken about 3 minutes per side and remove from the grill.  Pour hot sauce and butter mixture over the chicken.

4.  Toast ciabatta rolls lightly on the grill.

5.  Schmeer blue cheese mixture on the top of each roll, then assemble sandwiches with chicken, lettuce, tomato, and onion.

Notes:

  • Lite mayonnaise tends to be a bit sweet.  I’ll try this with light sour cream next time around.
  • Our whole family loves hot wings, so the chicken was a big hit.  And since each person can choose their own veggies on the sandwich, everyone gets a perfect sandwich.

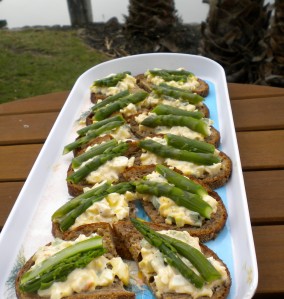
Egg and Asparagus Open Faced Sandwiches on Rye

“Oh!” they proclaim.  Eggs and asparagus are the absolute taste of Spring.  Eggs and asparagus are the quinsential coupling of the season.  “They” said so, but I had not indulged.

In my world, eggs and asparagus belong in completely different groups.  Asparagus is in the Prepare it Simply and Resist Any Urge to Add Anything That is Clearly Not Necessary group.  Also in this group are steaks, salmon, peaches, and blueberries.  Eggs are in the Salsa Always Served With This category.  Other items in this group are tortilla chips, and, well, eggs.

In the end, the rye bread did add a bit of oomf to this dish.  The eggs are basically deviled eggs without the relish with the egg whites minced ever so sweetly.  Its a nice little Sunday brunch kind of thing while totally breaking all of my previous rules.

Egg and Asparagus Open Faced Sandwiches on Rye

Ingredients:

  • 7 eggs, boiled and peeled
  • 1/4 cup mayonnaise
  • 1 tsp dijon mustard
  • 2 TBS parsley finely chopped (optional)
  • salt and pepper
  • 8 slices thinly sliced rye or other dark bread, cut in half
  • 8 spears asparagus

Directions:

  1. Halve eggs, put the yolks in a bowl and mince the whites.  To the yolks, add the mayonnaise and dijon mustard.  Mix, and fold in whites, then parsely if desired.  Salt and pepper to taste.
  2. Set a pot of salted water to boil while slicing the asparagus spears into thirds.  Place asparagus into boiling water for 2 minutes, drain in a collander and rinse with cold water until cool.  If the spears are thick, cut each in half lengthwise.
  3. Lightly toast the bread under the broiler, then top with egg mixture and top with 2 pieces of asparagus.

Notes:

  • These are oh, so pretty.
  • The main idea here is the egg spread, asparagus, and bread.  Play with the parts as you see fit.
  • Rye bread was one of those foods I just decided that I didn’t like as a kid.  Then one day I took a personal field trip to Berkeley’s Gourmet Ghetto and had a pastrami on rye at Saul‘s.  Life changing!

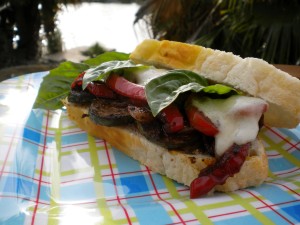
Spice of Life Vegetarian Sandwiches

How do you know that your sandwich totally rocks?  Why, of course, by sitting down at the lunch table at work, pulling out a sandwich that is technically a left over from dinner the night before, and coworkers’ jaws dropping with jealousy.  Fortunately, I work with a healthy bunch who all love a good meal.  Lunch discussions are more about current events, political ideology, local foods, and our profession in general, than anything found in People magazine or at TMZ.  Personally, this suits me well.

Back to the sandwich.  This little ditty is a breeze to make.  Simply combine the marinade ingredients and sliced veggies in a zip-lock bag and leave it on the counter.  Take a break from that amazing challenging task (tee-hee) while the marinade does its magic.  Finally, do a quick cook in the pan, assemble, and devour.  This is not the “oh my goodness, this IS spicy” kind of spicy like the grilled vegetable sandwich recipe, but rather the sweet on the front of the tongue followed by a delightful slow burn in the back of the mouth kind of spicy.

Spice of Life Vegetarian Sandwiches

makes 4 sandwiches

Ingredients:

  • 1/4 tsp each: salt, thyme, cinnamon, allspice, cayenne pepper, Chinese 5 spice powder, ground black pepper
  • 1 teaspoon red wine vinegar
  • 1 teaspoon olive oil
  • 2 zucchini, sliced into 1/4 inch rounds
  • 1/2 medium red onion, cut into 1/4-inch-thick slices
  • 1 large red bell pepper, cut into 1/4-inch-thick slices
  • Cooking spray
  • 1 teaspoon light mayonnaise
  • 8  slices  French bread
  • Mozzarella or Jack cheese slices
  • basil leaves

Directions:

  • Combine spices, vinegar and oil in a large zip-top plastic bag and mix together. Add zucchini, onion, bell pepper,seal and shake well to coat. Let stand 30 minutes, or refrigerate overnight.
  • Heat a skillet over medium high heat.  Coat with cooking spray.  Dump the contents of the bag into the pan and cook until the vegetables are tender, about 5 minutes.
  • Preheat broiler.
  • Divide sauteed vegetables among 4 french bread slices.  Top each with a slice of cheese.  Broil until cheese softens, about 1 minute.  Add remaining bread slices to the baking sheet and broil for 1 more minute or until the cheese melts and the bread browns, then lightly spread with mayonnaise.  Top cheese with basil leaves and toasted bread.

Notes:

  • Feel free to be pretty flexible with the veggies in here.  Any kind of squash or some eggplant would be perfect.
  • I totally like to snack on left overs.  These veggies are best in sandwiches and just don’t work well with casual “let me nibble on a few bites of zucchini” snacking style.
  • There are just enough juices to soak into the bread, providing some extra love.
  • If you clicked over to the grilled vegetable sandwich, you’ll notice how much the palm trees in the back yard have grown over the years.  There are 3 palms, with one of the three being a trio itself.  When we bought them about 5 years ago, they all fit in the back of our SUV.  Believe it or not!

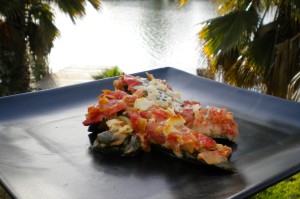
Mini Chile Rellenos

So, you’re out at a restaurant, perusing the menu.  How do you decide what to order?  I abide by a pretty simple rule:  order something I don’t usually cook at home.  Sometimes this is because an ingredient is just not in my pantry, such as saffron or a mixture of wild mushrooms.  Other times there are ingredients just not available in the local stores such as goat or rabbit or a unique cheese.

But the absolute king of all reasons to order out and not cook a dish at home is that the preparation will make my kitchen look like Armageddon arrived, twice.  For that last reason, chile rellenos are a total favorite to order at restaurants.  At home, I’ve made some darned good versions, but gawd, the mess makes me crazy!  Those tempting casserole versions have been given a test drive, but they just didn’t satisfy the craving for the real deal.  Here is a nice compromise – no deep frying, but all of the roasted poblano and cheese love.  These mini chile rellenos have all of the love of  roasted peppers and cheese without completely trashing the kitchen.  Bueno!

Mini Chile Rellenos

adapted from the Chile Rellenos de San Joaquin recipe on AllRecipes.com

Ingredients:

  • 5 poblano peppers, halved lengthwise, stems and seeds removed
  • 1 teaspoon olive oil
  • 1 small onion, thinly sliced
  • 1 can diced petite tomatoes
  • 1/2 tsp ground cumin
  • 6 ounces cotija cheese

Directions:

  1. Slice chiles in half lengthwise and remove stems and seeds.  Place chiles skin side up on a baking sheet, and broil until skins blister, about 6 minutes. Be careful not to let them burn. Remove chiles from the oven and return to the plastic bag, seal and set aside for 10 minutes.  Remove and discard the skins.
  2. Preheat oven to 350 degrees
  3. Heat olive oil in a small skillet over medium heat. Stir in sliced onions, and cook until soft, about 5 minutes. Add the tomatoes with the liquid and cook until onions and tomatoes achieve a sauce-like consistency, about 15 minutes. Stir occasionally. Season with cumin.
  4. To assemble the chiles rellenos: Slice cheese into 10 long rectangles (or sticks) 1/4-inch thick and approximately as long as the chiles. Roll each cheese rectangle into a chile half. Place rolled chiles into a baking dish and top with the tomato sauce. Crumble any extra cheese on top of the sauce. Bake for 30 to 40 minutes until the sauce is bubbly.

Notes:

  • The cojita cheese holds together nicely, so these make great sides without falling apart in the pan.
  • The cojita can easily be replaced with jack or a mixture or whatever light cheeses you need to use up.  I figure that once you have the amazing taste of roasted poblanos, its tough to go wrong.
  • Best chile relleno ever?  The Chilaca at the totally amazing Blue Agave.  Best food combined with the worst web site ever. 

Lemon Pound Cake

Springtime.  Sun, longer days, dreams of Summer bliss.  All such happy, happy  thoughts.

See, the gods and goddesses got the lemon season totally right.  Sunny yellow?  Check.  Tart but ready for a bit of sweet sugar?  Check.  A perfect transition between seasons.

Yet, the gods and goddesses did manage to get a few things wrong.  Limes and avocados ripe in the winter to spring months, but the tomatoes for guac in August.  What in the world does that do to margarita season? Another gripe is the whole root vegetable thing in October.  Here along the Pacific coast, October is sunny and warm and inviting and begs for leisurely walks to soak in the sun’s rays.  Do root vegetables go with this vibe?  I think not.

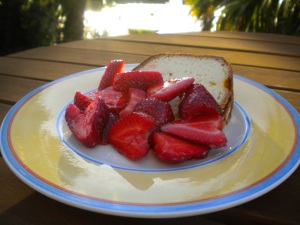
For now, let’s get back to Springtime, and lemons, and strawberries and make a lemon pound cake and smother a thick slice with strawberries fresh from the field.  We can all get on board with that plan.

Lemon Pound Cake

recipe inspired by Cooking Light , strawberries from Chan’s strawberry stand

Ingredients:

For the cake

  • Cooking spray
  • 3 TBS dry breadcrumbs
  • 3 1/4 cups all-purpose flour
  • 1/2 tsp baking soda
  • 1/4 tsp salt
  • 3/4 cup butter or stick margarine, softened
  • 2 1/2 cups sugar
  • 3 large eggs
  • 1 1/2 TBS grated lemon rind
  • 1/4 cup fresh lemon juice, divided
  • 8 oz low-fat sour cream
  • 1 cup powdered sugar

For the topping:

  • 2 baskets fresh strawberries, cleaned and sliced into thirds
  • 1 TBS sugar

Directions:

  1. Preheat oven to 350°.
  2. Coat a 10-inch tube pan with cooking spray, and dust with the breadcrumbs.
  3. Lightly spoon flour into dry measuring cups; level with a knife. Combine flour, baking soda, and salt in a bowl; stir well with a whisk. Beat the butter in a large bowl at medium speed of a mixer until light and fluffy. Gradually add the granulated sugar and lemon extract, beating until well-blended. Add eggs, 1 at a time, beating well after each addition. Add grated lemon rind and 2 tablespoons lemon juice; beat 30 seconds. Add flour mixture to sugar mixture alternately with sour cream, beating at low speed, beginning and ending with flour mixture.
  4. Spoon batter into prepared pan. Bake at 350° for 1 hour and 10 minutes or until a wooden pick inserted in center comes out clean. Cool in pan 10 minutes on a wire rack; remove from pan. Cool completely on wire rack. Combine 2 tablespoons of lemon juice and powdered sugar. Drizzle glaze over top of cake.
  5. Prepare strawberries by combining strawberries and sugar in a bowl and allowing to sit for at least 30 minutes.
  6. Slice lemon pound cake and top with strawberries.

Notes:

  1. Simply delicious!
  2. This is a perfect dessert for a meal you are hosting because the cake can be made a day before.
  3. Sneaking a thin slice of the pound cake for breakfast is totally acceptable.

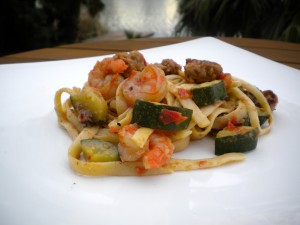
Linguini with Sausage and Zucchini

“Pasta with.”  About twice a month we have what I’ve come to call “Pasta with” for dinner.  Sometimes it is spaghetti with cheap canned sauce.  Sometimes it is tortellini with pesto.  In the summer, it’s often bow tie pasta with fresh tomatoes, a bit of olive oil, and torn basil.  Winter begs for pasta with Sunday Gravy.  In order to accommodate the preferences in the household, the pasta is drained in the colander and the “with” is in a skillet or bowl nearby.  Everyone gets as much pasta and much topping as desired.

But then, I was watching a bit of Lidia on the local public TV station. Lidia doesn’t seem to do pasta with, but does pasta in.  Long story short, I’ve been playing with ingredients, proportions and timing for a few months now and have finally found the perfect weeknight dish.  One, it is really tasty.  Two, the timing is, dare I say, perfect.  Put the water on the stove, get the skillet heating, prep the veggies and sausage, start cooking the pasta at the same time as the other ingredients, and both finish at the exact same time.  Bon Appetit.

Ingredients:

  • 1 lb linguine
  • 2 hot Italian sausages, casings removed,
  • 1/2 lb medium shrimp, shells and veins removed
  • 1 medium zucchini, quartered lengthwise and cut into 1/2 in pieces
  • 2 Roma tomatoes, seeded and diced
  • 2 garlic cloves, finely diced
  • 2 TBS Parmesan cheese, grated

Directions:

  1. Set pot of water and pan on medium – high heat while ingredients are being prepped.
  2. When water is boiling, set pasta in water.
  3. Add sausage to pan, and cook for 3 minutes, stirring to prevent burning.  Add tomatoes, and stir for 1 minute.  Add zucchini, and let set for 2 minutes.  Add 3 ladles of pasta water to the pan, followed by the garlic.  Let cook another 2 minutes.  Add shrimp and stir the mixture gently.
  4. Drain pasta in a colander.  The shrimp should be a bit translucent in the middle, but go ahead and add the pasta to the pan.   Using tongs, gently mix the sausage and vegetables into the pasta.  The pasta will absorb the liquid in the pan.
  5. Plate and top with a bit of Parmesan if desired.

Notes:

  • This recipe / technique has been tried and tried again at home.  Finally I came upon the correct timings, ingredients, and flavors. Enjoy!
  • Yes, this was tried with wine, but I found that the wine and sausage were just not a lovely pair.
  • Adding the tomatoes at the start was a stroke of perfect luck!  They add into the flavor, aroma, and color of the dish in the most beautiful way.
  • Mmmmmm, finely diced garlic in pasta broth.  Heaven!

Nutella Crepes

Let’s try a bit of logic today to figure out why it took so many darned years to make these delectable treats.  We will have two individual logical equations followed by one that connects the two.

  • LivinLocal does not like hazelnut flavored coffee beans.
  • LivinLocal does not line hazelnut flavored coffee additives, hence
  • LivinLocal does not like hazelnuts.
  • Nutella contains hazelnuts, hence
  • LivinLocal does not like Nutella.

Secondly,

  • LivinLocal usually manages to get food to stick to her expensive nonstick pans.
  • LivinLocal never has sticking problems with her cast iron skillet pans.
  • LivinLocal wants to make crepes.
  • Making crepes requires ninja crepe flipping skills
  • LivinLocal has no such ninja crepe flipping skills, hence
  • LivinLocal cannot make crepes because they require a nonstick pan and she is unable to use one properly, and crepes require ninja crepe flipping skills that are not currently evident.

In conclusion,

  • LivinLocal will not be able to make crepes nor would she like any Nutella filling

In short, wrong!   So, in avoidance of the clear lapses in logic above, we move quickly to the recipe.

Nutella Crepes

Crepes inspired by Paula Deen, Nutella inspired by my daughter

Ingredients:

  • 3 eggs
  • 1 1/3 cups low fat milk
  • 3/4 cups flour
  • 4 TBS butter, melted, plus a tad more for the pan
  • pinch of salt

Directions:

  1. In a medium mixing bowl, whisk eggs until light and frothy.  Vigorously whisk in remaining ingredients until incorporated, allowing for some small lumps to remain.   Set aside for 20 minutes.
  2. Heat a nonstick saute pan over medium heat.  Add a touch of butter, swirling to coat the bottom of the pan.  Add just enough batter (a scant 1/4 cup) to coat the bottom of the pan when swirled around.  Allow to set until the edges bubble lightly.  Gently flip the crepe and cook for 30 seconds on the other side.  Transfer to a plate. Continue making crepes until the batter runs out.
  3. Place one crepe on a plate, schmear Nutella on half of the crepe.  Fold in quarters.  Repeat.  Dust with powdered sugar.

Notes:

  • Yes, the serious whisking burns enough calories for you to have a second crepe.
  • The recipe called for 1/4 cup of batter in the pan, but that was too much.  When I got the technique down, I found that just over half of that was needed.
  • These crepes include enough butter in the batter to keep them from sticking.  Even with my pans.
  • People told me that after tossing the first crepe, the rest would be easy.  Let it be known that I tossed crepes 1, 3, 4, and 7 before getting the hang of it.
  • Crepes will become a regular part of my repertoire as they are really quite fun to make!

Deep Fried Pizza

Spring is arriving in this little nook of California.  The trees are showing off their spectacular blossoms, the asparagus is peeking out of the earth and the harvest has begun.  Strawberry stand owners are seen getting their little shacks ready to open for business.  The Brentwood Sweet Corn has been planted but doesn’t seem to be growing quickly yet, which is the only thing making local foodies grumpy.  But that happens every year.  We have the, ahem, pleasure of seeing this delicious food being planted and watching it slowly grow for what seems like six months before actually getting to cook up those cobs and munch away.  All in all a perfectly lovely time of year.

During our recent Spring Break, the husband and son went to Arizona to watch the first rounds of March Madness.  That left the 16 year old daughter and I at home on our own.  So what do we do?  Go on a total homemade junk food bender, of course!  Here my friend are directions on how to shop at a perfectly healthy grocery store and turn those prime ingredients into the most delicious junk food you have ever made at home.  Bon Appetit.

Fried Pizza

Adopted from the Panzarotti recipe in James McNair’s Favorites which is actually a book full of healthy recipes

Ingredients:

  • pizza dough
  • fresh mozzarella, sliced
  • pepperoni, sliced
  • marinara sauce
  • vegetable oil

Directions:

  1. Heat 2 inches of oil to 360 degrees in a dutch oven or other heavy pot.
  2. Roll out pizza dough into a rectangle and cut into 4 smaller rectangles.
  3. On one side of each rectangle, spread a bit of pizza sauce, and top with cheese and a few pepperoni slices.  Fold over and pinch the edges tightly, as if making empanadas.
  4. Fry one at a time, turning frequently until golden, about 5 minutes.  Remove and drain on paper towels.

Notes:

  • I purchased all but the oil at Trader Joe’s.
  • Not being a pepperoni fan, I used zucchini in mine.

Chicken in Coconut Gravy

Have you ever waited around and waited around and waited around for something to happen and it didn’t, so you just piped up and did it yourself?  At work, years ago, we shared monthly pot luck meals.  There was usually a theme, but that was not necessary.  It was just so comforting to share a good meal with people that depend on each other every day.  But the organizer moved away, and stuff happened, and times got rough with the economy, and I wondered what I could do to bring back shared warm experiences with this group of people.  Gathering a few partners in crime, we just set up dates and themes for the year, and voila, food and people appeared!  Food and stories are once again being shared, and we’re just enjoying some relaxing time together.  Mission accomplished.

A bonus to being part of creating themes is that my favorites get included!  We all love the fresh produce in the area, so salad bars and finger foods always include amazing local delectable treats.  This group loves soup, so that will be one theme.  But me?  I just love stuff over rice.  Veggies over rice, stir fry over rice, and especially curry over rice.  Luckily, a friend renamed it “goodness over rice” which was a wonderful advertising improvement.  This is my favorite curry recipe from my favorite curry cookbook that has been reworked for my own home kitchen and was well received at our shared meal.  And isn’t that what it is all about anyway?  Sharing food, sharing stories, and sharing time together.

Chicken Curry

Chicken Curry

Adapted from the recipe “chicken in thick coconut gravy” in 50 Great Curries of India by Camellia Panjabi

Ingredients:

  • 1 can coconut milk
  • 1 cup almond flour (almonds pulverized in a spice grinder until powdered)
  • 5 TBS canola oil
  • 15 dried arbol chilies
  • 4 heaped tsp coriander seeds
  • ¼ tsp mustard seeds
  • 3 green cardamon pods
  • 1 cinnamon stick
  • 1 tsp cumin seeds
  • 8 black peppercorns
  • 4 cloves
  • ½ tsp turmeric powder
  • 2 cups onion, diced
  • 1 inch piece ginger, peeled and diced
  • 5 cloves garlic, chopped
  • 2 ¼ lb boneless chicken, cut into 2 inch chunks
  • salt
  • water

Directions:

1.  To a large skillet heated over medium heat, add 1 TBS oil to coat the pan and the chilies.  Cook for 1 minute, stirring often.  Add the coriander, mustard, cardamon, and cinnamon and cook for just under a minute.  Add the cumin, peppercorns, cloves and turmeric, cooking 1 more minute stirring constantly.

2.  Put the spices, coconut milk, almond flour, 1 cup of the onions, and cloves into a blender.  Blend until it becomes a smooth paste, about 5 minutes.  Add water if the mixture becomes too thick to blend.

3.  To the skillet heated over medium low, add 3 TBS oil and the remaining onion.  Sauté slowly until just turning golden brown, about 15 minutes.  Add the spice paste and one cup of water to the skillet.  Stir to mix thoroughly.  Add the chicken and cook over low heat, covered, 15 minutes.  Remove the lid, add ½ cup water and continue cooking until the chicken is cooked through and the sauce reduces to the desired consistency.

Notes:

  • It is imperative to have the spices measured out and ready to use before step 1.
  • The original recipe used fresh coconut and required creating your own first and second extracts of milk.  I found by trial and error that using canned coconut milk with ground almonds produced a very similar consistency.
  • Buying all of these spices in the spice rack of pretty bottled spices at your local store would put you back a pretty penny.  Look for the spices in small bags in the Mexican or Indian sections of the store.
  • For those who like to double some of their spices, do not double the cardamon pods as they are quite strong in flavor and will easily take over the dish.
  • For the work potluck, I complete the steps through the sauteed onion, then put everything in a crockpot that I brought to work and plugged in to cook the chicken.
Pepperoncini Stuffed with Cajun Crab

Ready to add a delicious appetizer to your repertoire?  Looking for a bite sized tid bit to bring to the New Year’s Party that will stand out and make your friends swoon?  This is exactly what you’re looking for.

The recipe comes from the winners of Food Network’s first Food Network Star competition.  Dan and Steve won as a team and did a great job combining party foods with tips on how to create a fantastic event.  They were the perfect tag team kind of pair, and I loved them. You haven’t noticed them lately?  Ever?  That feeds into my theory that the Food Network competition style moves the best of the middle to the top and then is disappointed when the show doesn’t deliver.  But, that’s a gripe for another day.  Today, give these a try and watch them disappear before the ball drops on New Year’s Eve.

Pepperoncini Stuffed with Cajun Crab

from Dan Smith and Steve McDonagh on the Food Network

Ingredients:

  • 36 pepperoncini
  • 1 lb cream cheese at room temperature
  • 8 oz crab meat, shredded  (see note below)
  • 1 1/2 TBS Cajun seasoning
  • 1 TBS hot sauce
  • 1 tsp dried thyme leaves
  • finely chopped fresh parsley leaves

Directions:

  1. Cut the stem end off the pepperoncini and carefully scrape out the seeds.  Set aside on paper towels to drain.
  2. In a mixer, beat the cream cheese until smooth. Add the Cajun seasoning, hot sauce, and thyme and mix until blended.  Gently mix in the crab.
  3. Place the mixture into a zip lock bag, cut off one corner, and pipe into the pepperoncinis. Dip the cream cheese end of the pepperoncini in the chopped parsley and transfer to a serving tray.

Notes:

  • The combination of peppers and spices give this some pucker power that is balanced by the cream cheese.
  • The picture shows the dish with and extra sprinkling of Cajun spices and not the parsley as in the instructions.  Either is wonderful.
  • The original recipe calls for crab claw meat shredded.  Are you kidding me?  Who would ever shred claw meat?  We’ve made this with both canned shredded and packaged chunk meat with great results.  If you can spring for claws, use them as additional bites on their own.
  • We’ve also served the crab mixture as a dip with pita chips.  Yum!
  • They still have a selection of recipes on the Food Network website and nothing by them has ever been a dud.